3D PRINTING MY SKULL
Abstract
This project outlines a practical method for printing accurate anatomical replicas from medical CT imaging. The workflow includes acquiring a high-quality CT scan, importing and segmenting the data in a DICOM viewer, and exporting it as an STL file. Next, digital post processing is required for model cleaning, solidification, establishing sufficient wall thickness, and hollowing. This is followed by support generation and resin 3D printing. We'll conclude with post print washing, UV curing, and final inspection.
Background
From a young age, I was deeply interested in medicine, pharmacology, and anatomy. Perhaps this interest stemmed from my father, who is a doctor of human medicine. However, I never turned those interests into something interesting. Recently, I got into 3D printing, which was the perfect oppertunity to finally change that. I knew that multiplanar reconstruction can be used to create 3D images for pre-surgical planning and diagnosis. Therefore, creating a 3D printable model from this data also had to be possible. Since I already had a CT scan of my own skull from a year ago, I decided to use that as my starting point.
Getting a CT Scan
The very first step in this process is to obtain a high quality CT (Computed Tomography) scan of the bodypart you want to print. Many hospital clinics and radiology centers offer this service. However, it's important to remember that most facilities require a referral or letter from a doctor. Before proceeding, make sure to research the specific requirements and costs in your country or region.
Also, be mindful of the radiation exposure associated with CT scans, as it carries a small risk of inducing cancer. Pregnant women should generally avoid CT scans. Always consult with your doctor before undergoing a CT scan.
If a CT scan is performed, it's important to ensure that the images are of high quality. These images will later be used for 3D multiplanar reconstruction, so clarity and detail are key. I highly recommend the following parameters for optimal results:
- Gantry Tilt/Oblique Angle: 0° (This ensures true axial images without distortion.)
- Reconstructed Slice Increment: Less than or equal to the slice thickness.
- Reconstruction Algorithm: Use a "Bone" or "High Resolution" algorithm to enhance bone detail.
- Slice Thickness: Aim for a very fine slice thickness, ideally below 1 mm.
- Pixel Size: Keep the pixel size small, at or below 0.5 mm, for sharp detail.
- File Format: The images must be saved in uncompressed DICOM (Digital Imaging and Communications in Medicine) format.

Importing the CT Scan Data into a Viewer
Once you have your CT scan data in DICOM format, the next step is to import it into a DICOM viewer. There are various paid and free options available. For this workflow, I personally use RadiAnt DICOM Viewer, which is a good free option. Load your uncompressed DICOM files into your chosen viewer to begin the digital processing.

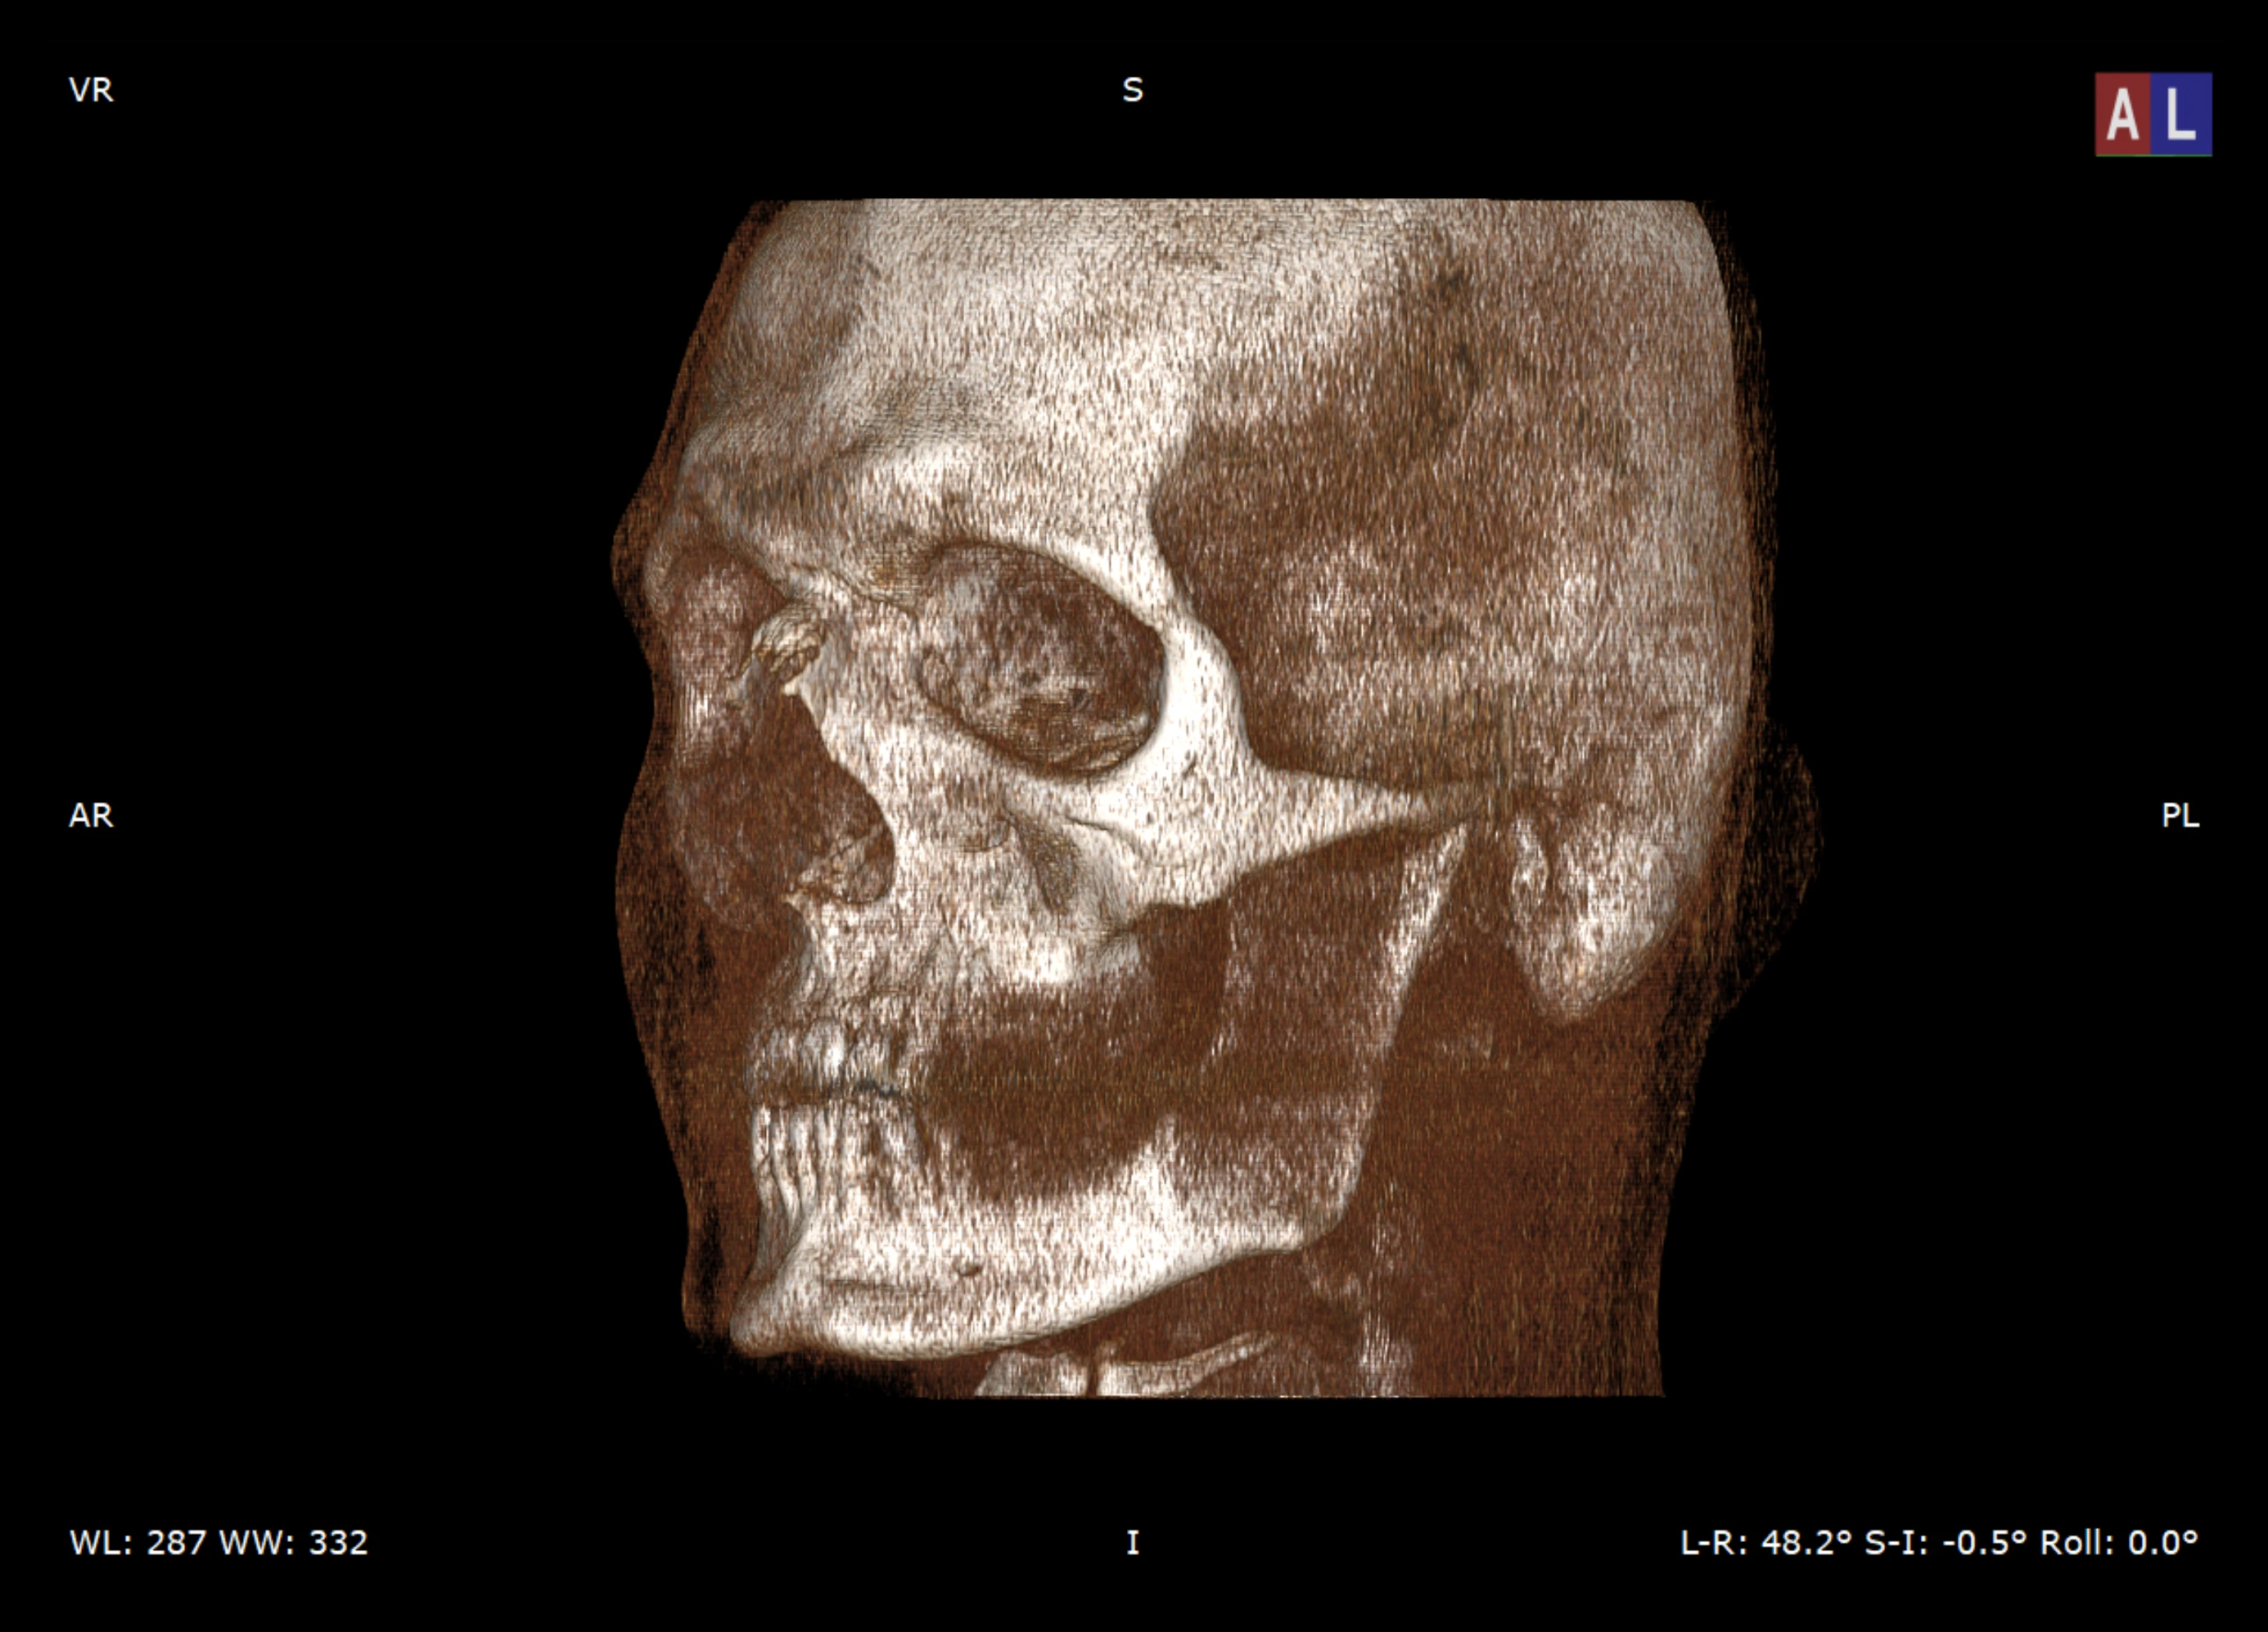
3D Multiplanar Reconstruction (MPR)
With your CT scan loaded into the viewer, it's time to perform a 3D Multiplanar Reconstruction, or MPR. This technique essentially transforms the 2D slice data into a navigable 3D representation.
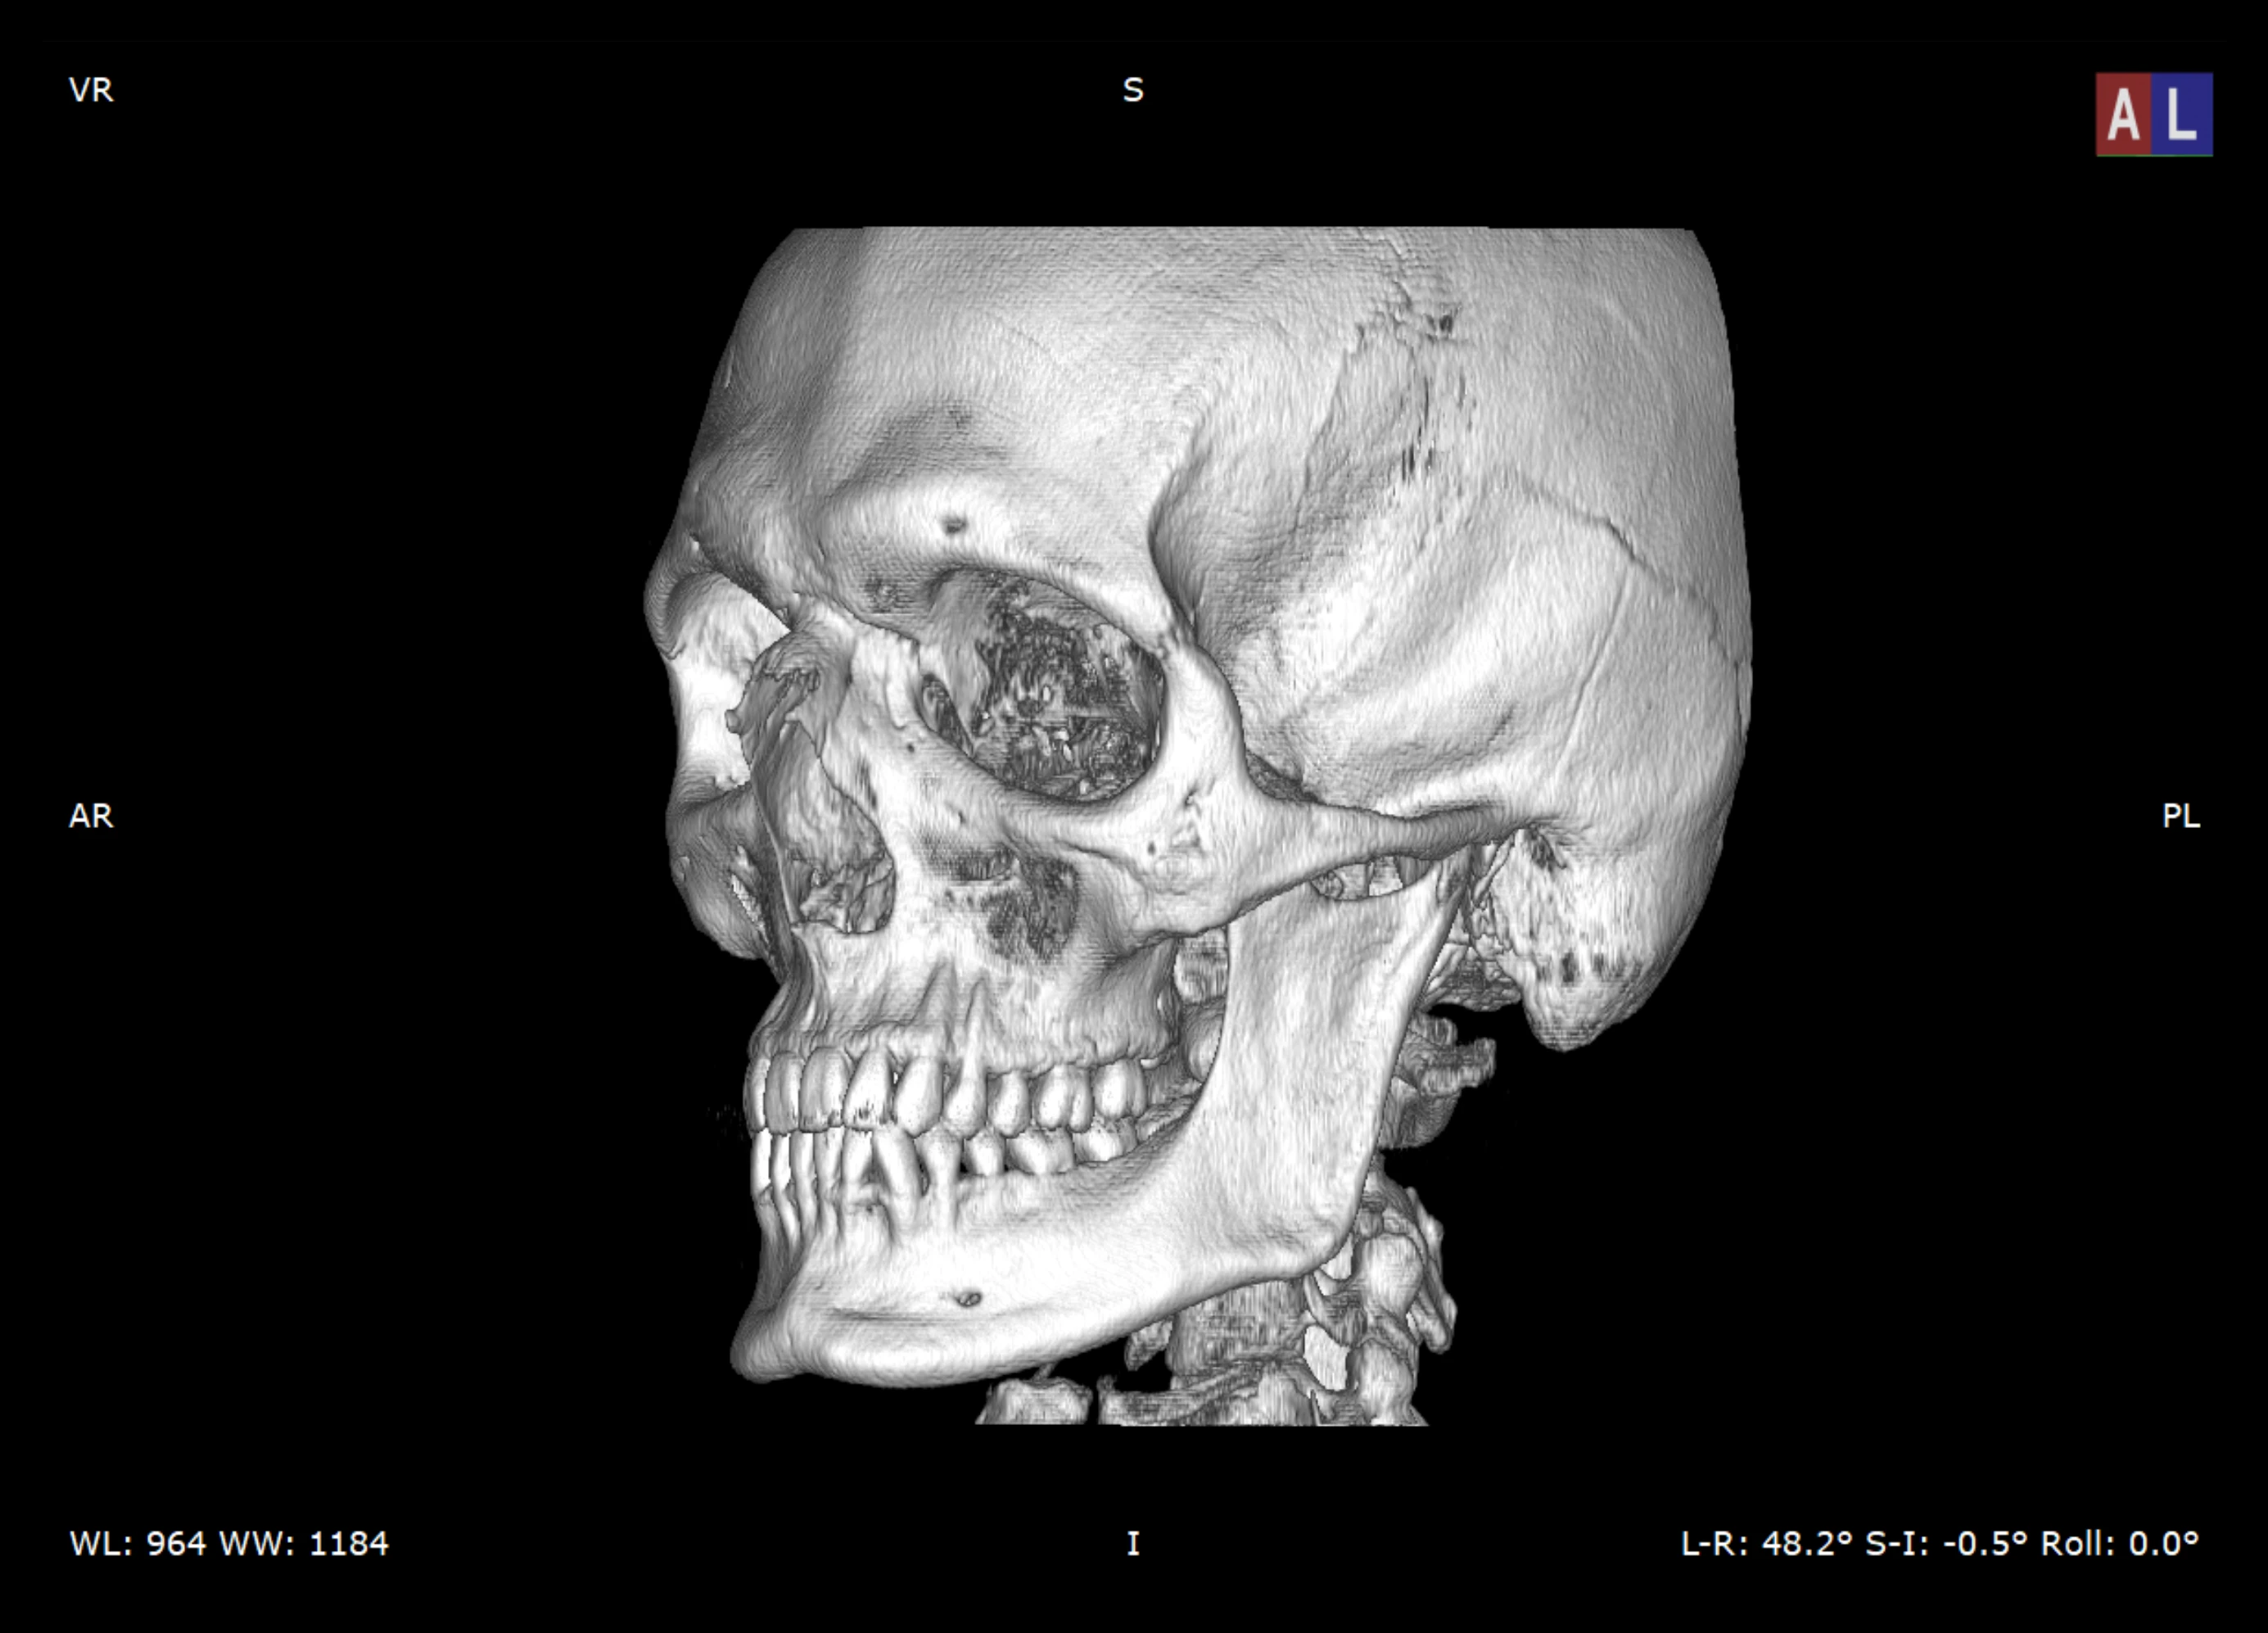
Segmentation Adjustment and Algorithm Selection
Now, we need to refine the 3D MPR by choosing the correct algorithm and adjusting the threshold settings. The goal is to accurately isolate the cranial bones and cervical vertebrae from the surrounding soft tissues and noise. Look for an algorithm specifically designed for bone visualization. In Radiant DICOM Viewer, this is named "Bones B/W".
After selecting the appropriate algorithm, you'll need to meticulously adjust the threshold. This process involves setting a range of pixel intensity values that correspond to bone tissue. The aim is to ensure that the bones are clearly visible and well defined, while simultaneously minimizing any unwanted noise or artifacts from other tissues.
Exporting the STL File
Once you are satisfied with your 3D multiplanar reconstruction and segmentation adjustments, the next step is to export the current view as an STL (Stereolithography) file. The STL format is the industry standard for 3D printing, representing a 3D model as a collection of interconnected triangles. This file will contain the geometric information of your segmented skull, ready for further processing in 3D modeling software.

Model Cleaning and Preparation for 3D Printing
After exporting your STL file, you'll likely find that the raw model is far from ideal for 3D printing. It often contains numerous issues such as disconnected planes, isolated mesh islands, various holes, and excessively thin walls. These imperfections make the model unsuitable for direct printing. This step involves a series of cleaning and preparation tasks:
- Smoothing: The initial mesh can be jagged or noisy. Software like Blender is excellent for smoothing out the surfaces, creating a more aesthetically pleasing and printable model.
- Removing Islands: Often, the segmentation process leaves behind small, disconnected pieces of mesh, referred to as "islands." These need to be removed to ensure a clean, continuous model. Tools like Meshmixer are ideal for this task.
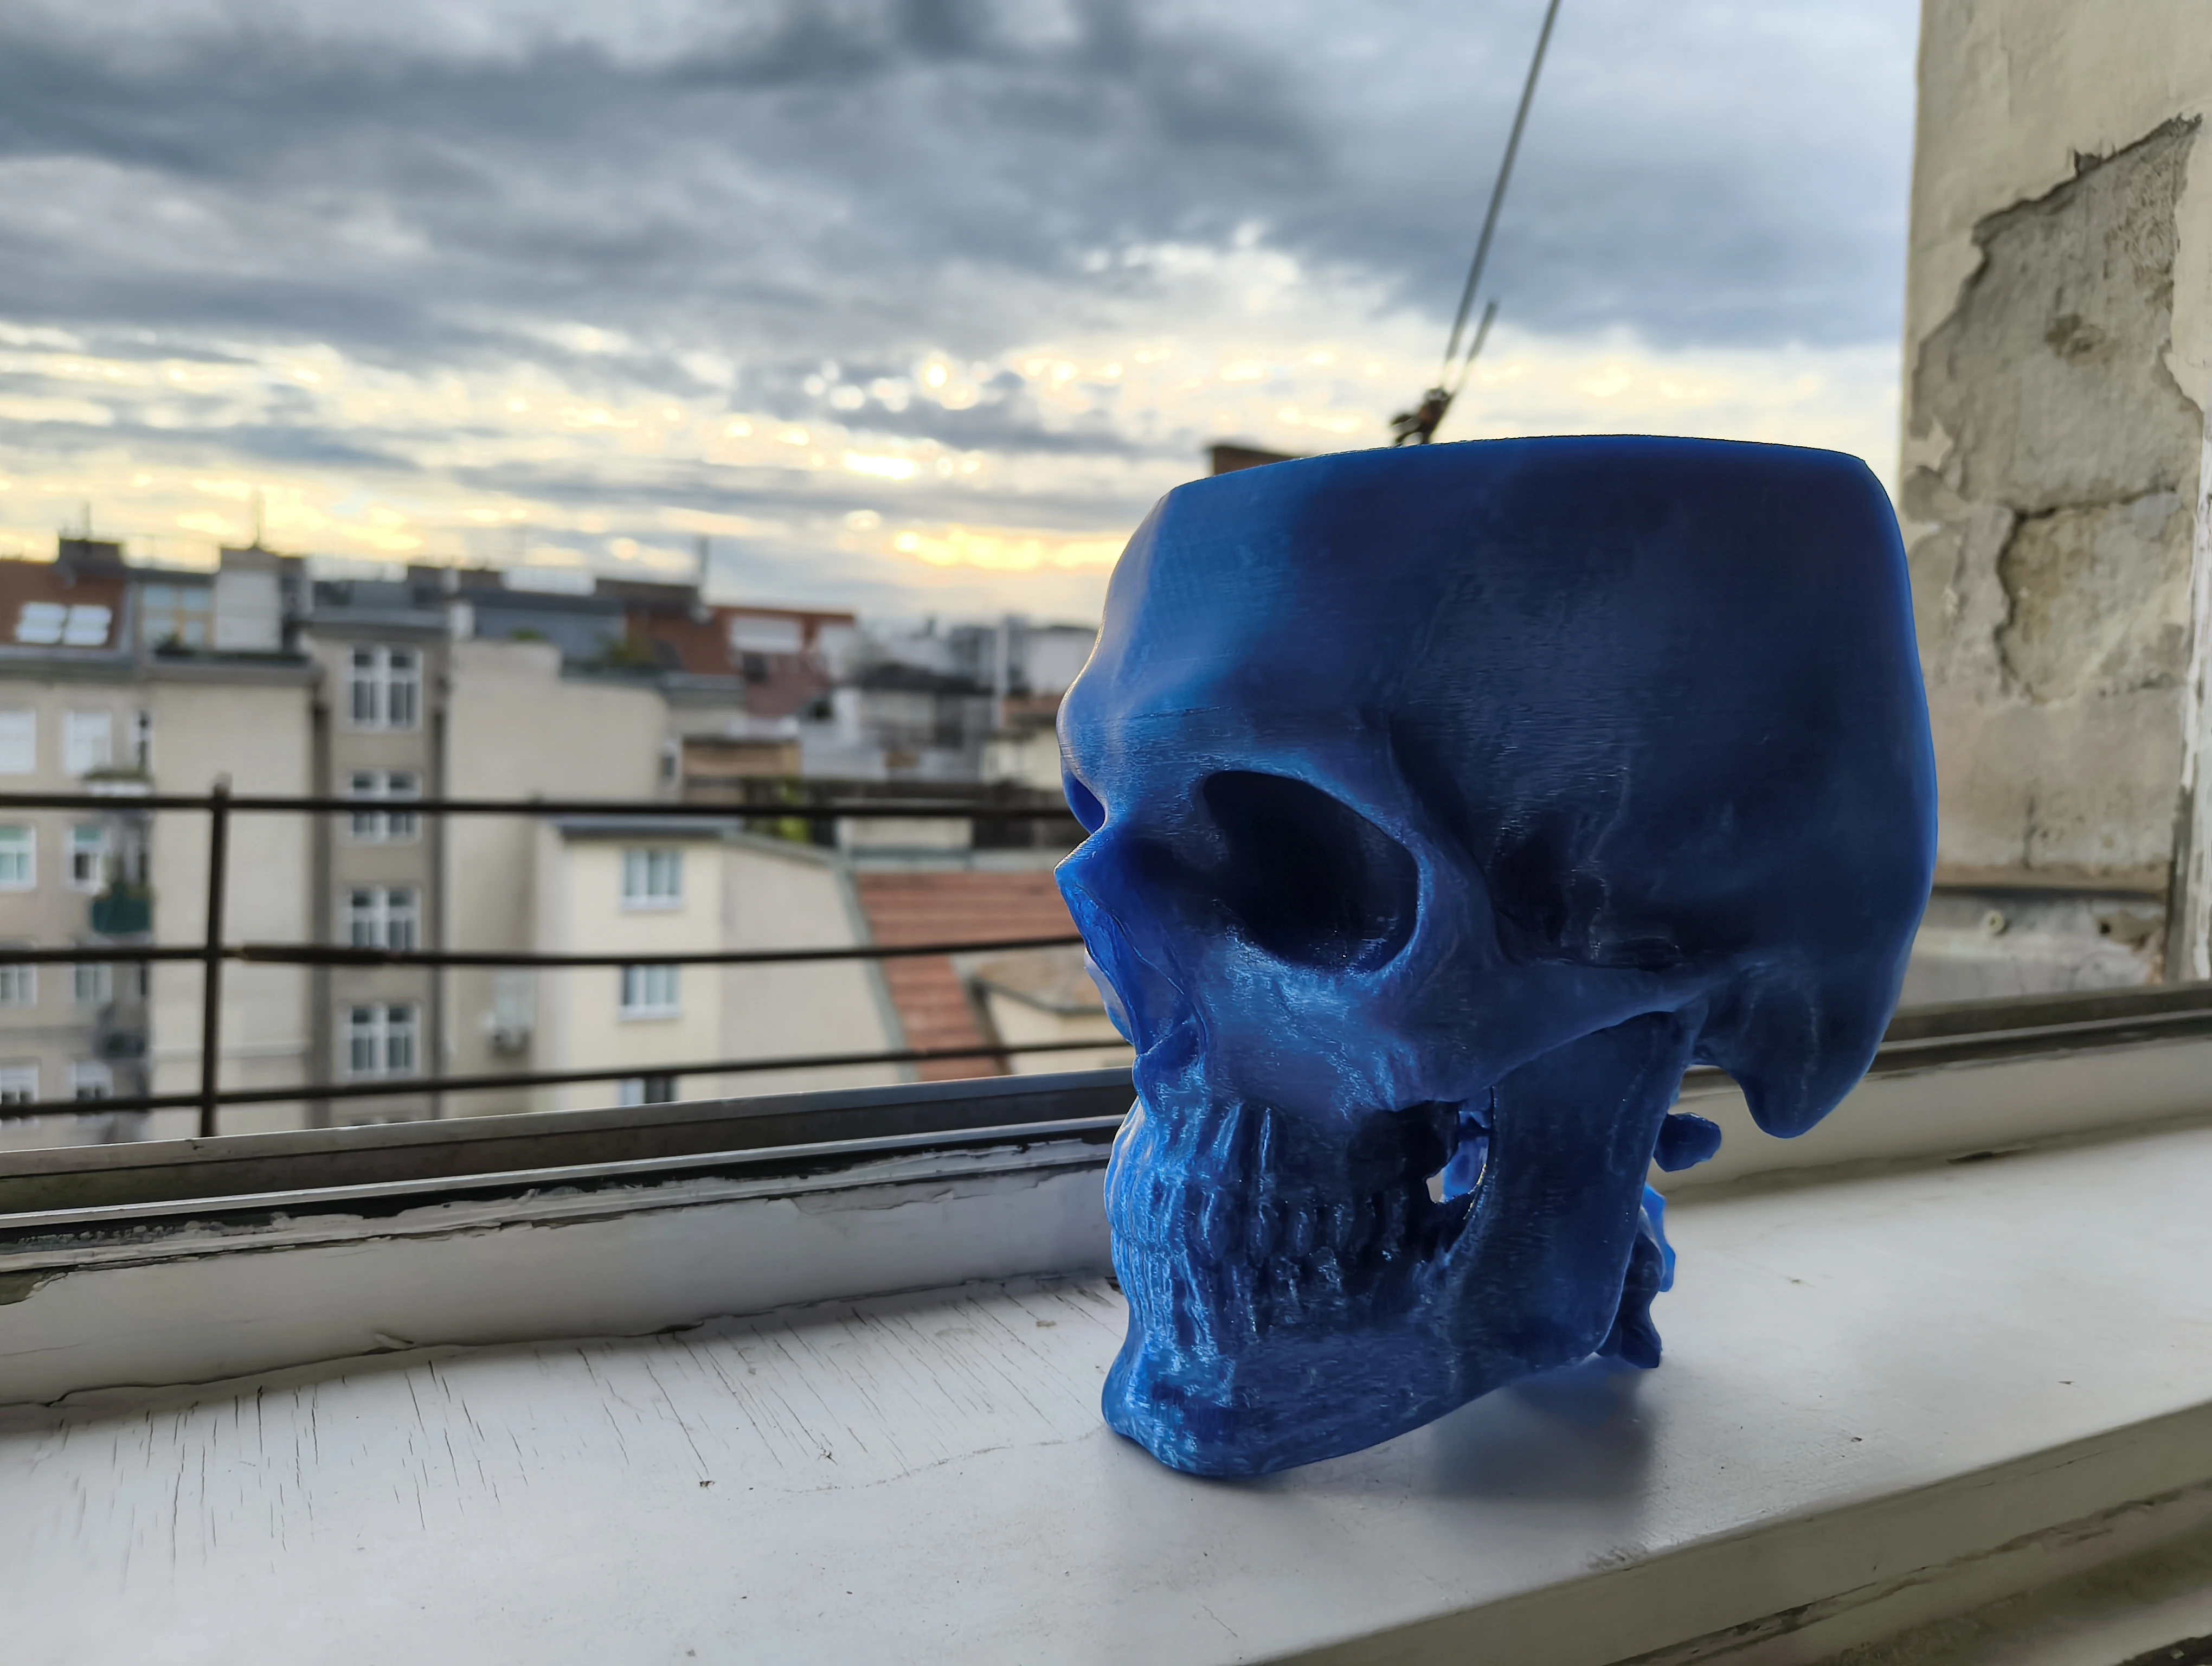
- Making the File Solid: It's essential to ensure your model is "watertight" or solid, meaning it has no open edges or gaps. For my skull model, the internal structure (where the brain would be) was particularly problematic with holes and mesh islands. To address this, I chose to completely fill out the head, effectively making the entire skull a solid object. This simplifies the geometry and ensures printability.
- Ensuring Wall Thickness: For successful 3D printing, especially with resin printers, a minimum wall thickness is vital to prevent breakage and ensure structural integrity. You must ensure your model has a minimum wall thickness of at least 1mm throughout.
- Hollowing the STL File: To save on printing material and reduce print time, the final step in preparation is to hollow out your STL file. Meshmixer is a great tool for this. When hollowing, remember to add drainage holes strategically to allow uncured resin to escape from the inside of the model during post processing.
Creating Supports for 3D Printing
Before you can send your meticulously prepared model to a 3D printer, you need to create supports. Supports are temporary structures that prevent overhangs and intricate details from collapsing during the printing process, especially with resin printers. There are many excellent software options available for generating supports, including Ultimaker Cura, PrusaSlicer, and Meshmixer. I personally chose Meshmixer for this task due to its robust support generation capabilities and flexibility. The software will analyze your model's geometry and automatically suggest optimal support placement, which you can then fine tune manually for best results.

Resin-Based 3D Printing
Now comes the exciting part: 3D printing your skull model! For detailed anatomical models like this, resin based 3D printers (SLA or DLP) are highly recommended due to their ability to produce incredibly fine details and smooth surfaces. While many consumer grade resin printers are available, a common challenge is their build volume. Most can't print a full sized skull in a single piece.
You have a few options to overcome this:
- Slicing the Model: You could slice your digital model into smaller, manageable sections using your slicing software. These sections can then be printed separately on a consumer 3D resin printer and later assembled.
- Online Printing Services: Many online services specialize in 3D printing and have industrial grade machines with larger build volumes. You can simply upload your STL file and have them print and ship it to you.
- Local Print Shops: Some local print shops offer 3D printing services, allowing you to print your model yourself or have them do it for you.
- Scaling the Model: If absolute life size accuracy isn't critical, you could scale down your model to fit within the build volume of a more common consumer 3D printer.
Personally, I am fortunate to own an Anycubic Photon Mono M7 Max 3D printer, which boasts a large enough build volume to handle my skull model in a single print, saving me the hassle of slicing and assembly.
Post-Print Washing
After your model has finished printing on the resin printer, it will emerge covered in uncured, sticky liquid resin. This residual resin needs to be thoroughly removed to prevent it from interfering with the final curing process and to ensure a clean, non tacky finish. This is where post print washing comes in.
The most common and effective method is to wash the printed model in isopropyl alcohol (IPA) or a specialized resin cleaner. You can use a wash and cure station, which automates this process, or perform it manually using a container filled with IPA and a soft brush. Gently agitate the model in the cleaning solution, ensuring all surfaces are exposed. You might need to perform multiple washes with fresh IPA until the model is no longer sticky. Always handle uncured resin with gloves and ensure proper ventilation, as it can be an irritant.
UV Post-Curing
Once your 3D printed model is thoroughly washed and dry, the next step is UV post curing. While the resin is partially cured during the printing process by the printer's UV light, it's not fully hardened or stable. Post curing exposes the model to additional ultraviolet (UV) light, which completes the polymerization process, fully hardening and strengthening the resin structure.
This step significantly improves the model's mechanical properties, making it less brittle, more durable, and resistant to warping or deformation over time. It also eliminates any remaining tackiness on the surface. You can use a dedicated UV curing station (often combined with a wash station), a DIY UV light box, or even direct sunlight (though control over UV exposure is less precise). Ensure all surfaces of the model are exposed to the UV light for the recommended duration, typically a few minutes, depending on the resin type and UV light intensity. This final hardening process is essential for the longevity and integrity of your 3D print.
Final Inspection and Finishing
Congratulations, you're almost there! The final step involves a thorough inspection and any necessary finishing touches to prepare your anatomical model for presentation or study.
- Support Removal: Carefully take off all those supports. You can use flush cutters, pliers, or even your fingers, depending on where they are. Make sure not to scratch your model.
- Final Cleaning: After support removal, there might be small nubs or marks where the supports were attached. You can gently sand these down with fine grit sandpaper or use a hobby knife to carefully trim them for a smoother finish.
- Quality Checks: Perform a detailed quality check of your entire model. Look for any remaining uncured resin, small imperfections, or areas that might need further refinement. Ensure all details are crisp and accurate according to your original scan.
- Optional Finishing: Depending on your desired outcome, you might consider additional finishing steps like priming and painting the model to enhance its visual appeal or highlight specific anatomical features.
With these steps completed, your detailed, tangible 3D printed model of your skull is ready! It's a fantastic tool for personal study, educational purposes, or simply as a unique piece of art.